Playing in the Dark…week 12-14

Unit 1: The Camera - Film or Digital
Learning Outcome 1 (LO1): Understand contexts and approached to photography
AC 1.1: Identify and assess contexts and approaches to photography
Playing in the Dark explores the use of shadows and low light situations to capture images that provide opportunities to use creative camera techniques. Urban, landscape and interior home photography offer moments to explore topographic, location as well as a detail perspective. The purpose of this assignment is to explore the use of light in photography with special reference to shadows and light conditions.
I used my digital camera to capture images in my home and my neighbourhood (a train station, village, woods) in Surrey. The time of the day was very important element to consider when I took the pictures. As this project is called Playing in the Dark, I took pictures mainly in the evening and during golden hour in the morning/evening to be able to capture the long shadows and soft colours.
For the images taken in the evening I used a long exposure technique to be able to capture light trails. For this type of technique I needed my tripod to avoid a camera shake. When taking the pictures in the morning I played with aperture to capture the depth of field.
Following my research on Michael Freeman and his Shadowland in my previous blog Shadowland I also researched the following photographers for inspiration.

Bruce Davidson
(Born 1933)
Bruce Davidson is an American photographer. He has been a member of the Magnum Photos agency since 1958. His photographs, notably those taken in Harlem, New York City, have been widely exhibited and published. Davidson is known for photographing communities usually hostile to outsiders. An image from his Brooklyn Gang series was used as the cover for Bob Dylan's 2009 album Together Through Life. In East 100th Street (1966-68), Davidson produced a shocking study of the poverty and discrimination on a block in Harlem, followed by an investigation of the urban underground in Subway (1980-85), another captured essay on a particular American subculture. My favourite photos are below.


Stephen Shore
(Born 1947)
Stephen Shore is an American photographer known for his images of banal scenes and objects in the United States, and for his pioneering use of colour in art photography. His books include Uncommon Places (1982) and American Surfaces (1999), photographs that he took on cross-country road trips in the 1970s. In 1975 Shore received a Guggenheim Fellowship. In 1971, he was the first living photographer to be exhibited at the Metropolitan Museum of Art in New York City, where he had a solo show of black and white photographs. In 1976 he had a solo exhibition of colour photographs at the Museum of Modern Art. In 2010 he received an Honorary Fellowship from the Royal Photographic Society. Along with others, especially William Eggleston (as mentioned in my blog Home Sweet Home, week 1), Shore is recognised as one of the leading photographers who established colour photography as an art form.


Learning Outcome 2 (LO2)
Be able to identify the characteristics of camera systems
AC 2.1: Identify the characteristics of camera systems and related equipment
AC 2.2: Identify camera characteristics in relation to image outcomes
The Exposure Triangle (AC 2.1, 2.2)

The Exposure Triangle comprises of aperture, shutter speed, and ISO. These three elements work, control and regulate together the amount of light that makes it to the light-sensitive surface (aperture and shutter speed) and the sensitivity of that surface (film or digital ISO). Aperture controls depth of field, shutter speed can blur or freeze action, and ISO can add or subtract film grain or digital noise from an image.
Aperture is a hole in a lens through which light travels. I can control how much light enters my camera by making open or close aperture. It works exactly the same way as the pupil in my eye, which dilates in dark and contracts in bright conditions.
Aperture is measured in f-stops (f-numbers).

By selecting a wide aperture f2.8, the shutter speed is faster, letting in more light than with a narrow aperture f22, the shutter speed is much slower, letting in much less light. It’s a balancing act.

Changing the aperture reflects in the depth of field. If my aim is to clearly define my subject against a background I set up my aperture to be open wide and focus on the subject. The depth of field is then shallow. Background then becomes out of focus and creates so called "Bokeh." The word Bokeh comes from Japanese language and translates as “blur”. Bokeh forcing us to focus our attention on a particular area of the image. This is a desirable technique for portraits or general photos of subject where I want to isolate the subject.
On the other side a narrow aperture, high f-number like f22, causes everything on the picture in focus. Landscape and architecture photography could be a great example of using a deep depth of field.
Task 1: Depth of Field, Selective focus (AC 2.1, 2.2, 3.2)
Present a series of 3 images in response to the title using the depth of field and/or selective focus.
Image 1

1/125s, f/11, ISO 720, zoom lens 24-70mm, f/2.8S
In this image I wanted to put as much as I could in focus and I used aperture f/11. I created this image in the morning in Wimbledon Common with minimum of light. I didn’t have a tripod with me so I used a shutter speed 1/125s. I had to compensate the desired exposure by switching ISO to higher number, in this case I used ISO 720 (otherwise the image would be too dark/underexposed). My aim was to capture a light coming through the trees. This image would fall into Freeman’s first category of his shadows type - “basic rich” as I described it in my blog Shadowland. Shadows go almost black but not quite and occupy almost 90% of the image. The contrast of light and shadow is strong. I decided not to open shadows to enhance the mystery feeling. Eyes are drown to the lit spot in the forest. The image could be identified as a highlight salient; the eyes move from the bright spot to the white trees in the back. As the trees are spread across the picture, our eyes are moving across it as well.
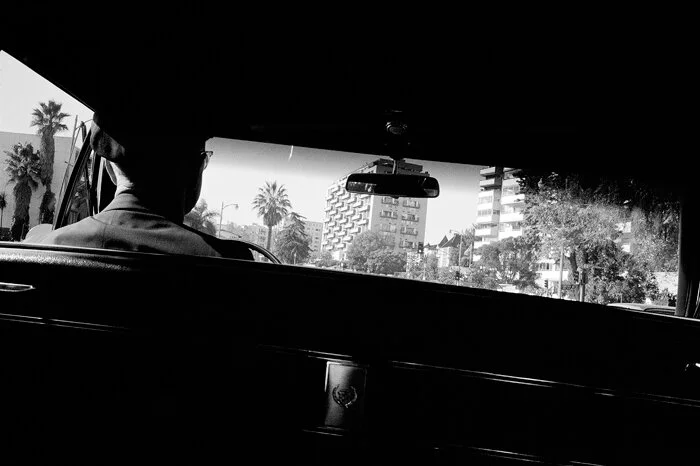
Image 2

1/50s, f/4, ISO 250, zoom lens 24-70mm, f/2.8S
I took this image in the afternoon in my neighbourhood. I like the strong definition of shadows here creating geometry lines. I used wider aperture f/4 as I wanted to slightly blur the foreground and the camera focus was on a runner in the well lit square. My decision on converting the image into black and white was based on my intention to highlight the contrast. According to Freeman’s shadows definition (as I mentioned in my previous blog) this image would be identified as “chiaroscuro”. Chiaroscuro is defined as the extreme contrast, there is almost a block of bright and dark. The light doesn’t really follow the subject, it is more abstract and geometrical. The key points for chiaroscuro are strong contrast, spotlighting and pulling attention.
Image 3

1/80s, f/2.2, ISO 100, prime lens 85mm, f/1.8S
This image of a ceramic vase is captured in the morning using only natural light coming into to the room through the window. According to Michael Freeman’s shadows definition (as I mentioned in my previous blog) this is an example of “smooth graded” shadows where border lines are not sharply defined. It is a smooth transition without shadow edges from the lit parts of the scene towards darker ones but not necessarily black. I used a wide aperture f/2.2 to create a very shallow depth of field, bokeh. Dark shadows, mid tones and highlights are well defined here as well.
Task 2: Shutter Speed (AC 2.1, 2.2, 3.2)
Shutter speed controls the length of time that light enters a camera and can be used to create many different effects.
Blur : by controlling shutter speed I can create a blur movement (slow shutter speed)
as shutter stays open for longer it causes objects to move while I’m taking the picture
the blur starts about at 1/60s – moving cars, people will be blurred; the slower the speed the greater the blur
if shooting at a slower shutter speed than 1/60s I’d usually use a tripod otherwise everything on my picture will be blurred; it’s called “camera shake”
Freeze or frozen movement (fast shutter speed)
by using the fast shutter speed I can create “frozen” moment on my picture; it’s usually from 1/125s
for sport photography I’d use much faster shutter speed, 1/1000s, 1/2000s or even faster
Shutter speed is an important part of the exposure triangle, so I can regulate it for balancing the light in the images. The faster shutter speed, less light can enter my camera and the opposite, the slower shutter speed the more light is in my camera.

ISO and noise
ISO controls how sensitive a camera is to light. ISO together with aperture and shutter speed is part of the triangle/balancing act/exposure. This trio is inseparable.
In traditional (film) photography ISO was the indication of how sensitive a film was to light. It was measured in numbers – the lower the number the lower the sensitivity of the film and the finer the grain (or so called "noise") in the shot.
In the digital photography ISO measures the sensitivity of the image sensor. The same principles apply here as in a film photography. The higher ISO number the more sensitivity to light that can result in more grain (“noise”) in the picture. Luckily cameras are improving all the time and these days despite using high ISO settings, the images can be still usable. Sometimes the grain is even in demand and used in photography, for example in images of singers/concerts/posters.
In general, in darker environment I can increase ISO to increase the sensitivity of my camera.
In brighter environment it’s the opposite, I decrease the sensitivity of my camera by decreasing ISO.

Task 2: Present a series of 3 images in response to the title using slow or fast shutter speed techniques. Techniques to consider: Multiple exposure, Movement or Painting with Light.
I have decided to use the long exposure technique to create a light trail. For this technique I set up a slow shutter speed (couple of seconds) in my camera. For such a long exposure I had to use a tripod. I was shooting in a manual mode.
Image 1

25s, f/13, ISO 100, zoom lens 24-70mm/2.8S
I took this image in the evening in Claygate, a little village in Surrey. I captured two cars coming in opposite direction and that’s the reason we can see red and white/yellow light trails. The shutter speed of 25s (and the speed of cars) was slow enough not to capture the cars at all. I set up ISO 100 as I wanted to avoid any grain/noise and I balanced the exposure with aperture. My aim was to capture not only light trails but shadows as well. Dark shadows occupy around 90% of the image. Mid tones are visible on the brick wall and bright tones are the almost white lines of light trails. According to Michael Freeman’s types of shadow (as I described in my previous blog) this would be a basic rich shadow. The light trails function as leading lines here as they navigate eyes through the picture.
Image 2

4s, f/20, ISO 100, zoom lens 24-70mm/2.8S
I took this image at the rail station in a Surrey village in the evening just after sunset. I used a shutter speed of 4s, a bit faster than in image 1. As in previous shot, I used a manual mode and set up the ISO 100 to avoid any noise. Dark shadows are the train tracks, mid tones would be the tiles and roof and highlights are the lights and white repetitive pillars. According to Michael Freeman’s shadow definition this is a basic rich.
Image 3

1s, f/4, ISO 100, lens 14-30mm, f/4S
For this image I used a wide angle lens to capture the whole scene as I saw it. It was getting quite dark from my right side but the crossing was well lit by street lamps. I managed to capture a cast shadow of the lamp on the left. According to Michael Freeman’s type of shadows this would be again a basic rich. I was inspired by Stephen Shore’s composition (as seen on his first picture which I mentioned earlier in this blog where he captured the crossing and streets during the daylight). A wide angle lens gives pictures a different perspective.
Learning Outcome 3 (LO3)
Be able to control camera
AC 3.1: Produce photographs for a specified purpose
AC 3.2: Assess photographic activity
Task 3: Final take (AC 3.1, 3.2)
Present a series of 5 images in response to the title using photographic techniques chosen by you. You can use any techniques you are familiar with. You can research and apply in and off camera manipulation.
Image 1

2.5s, f/6.3, ISO 100, wide angle lens 14-30mm, f/4S
I used a slow shutter speed 2.5s to create a light trail on this picture. For such a slow shutter speed I needed a tripod. I like the reflection on left side from the poster and how it colourfully communicates with the red light trails. My aim was to capture as much angle as possible so I used a wide angle lens. According to Michael Freeman’s shadow types (as described in my previous blog) that would be a basic rich or chiaroscuro.
Image 2

10s, f/22, ISO 100, wide angle lens 14-30mm, f/4S
This is the same place and time as my in Image 1 in Shutter speed section but this time I captured only red light trails created by a bus. I like how the lines are leading our eyes from one side to the other as well as the lines on the road. Another interesting visual effect is a repetition of two signs (one is lit by a street lamp and one is above the light trails). I was happy to capture a shadow on the brick wall created by a street lamp from the right top corner (the lamp is not captured on this image but the the corner is warmly lit). This is a basic rich shadow.
Image 3

8s, f/16, ISO 100, wide angle lens 14-30mm, f/4S
I captured a passing train at the train station by using a slow shutter speed. I needed my tripod to avoid a camera shake. My aim was to capture light trails and repetition of pillars, lines and lights. The shutter speed was so slow that enabled to portray the other side of the station through the train. This is again a type of a basic rich shadow. I can see dark shadows (right bottom corner and sky, mid tones are at the lit roof and train) and highlights (white lines on the train and lights from lamps).
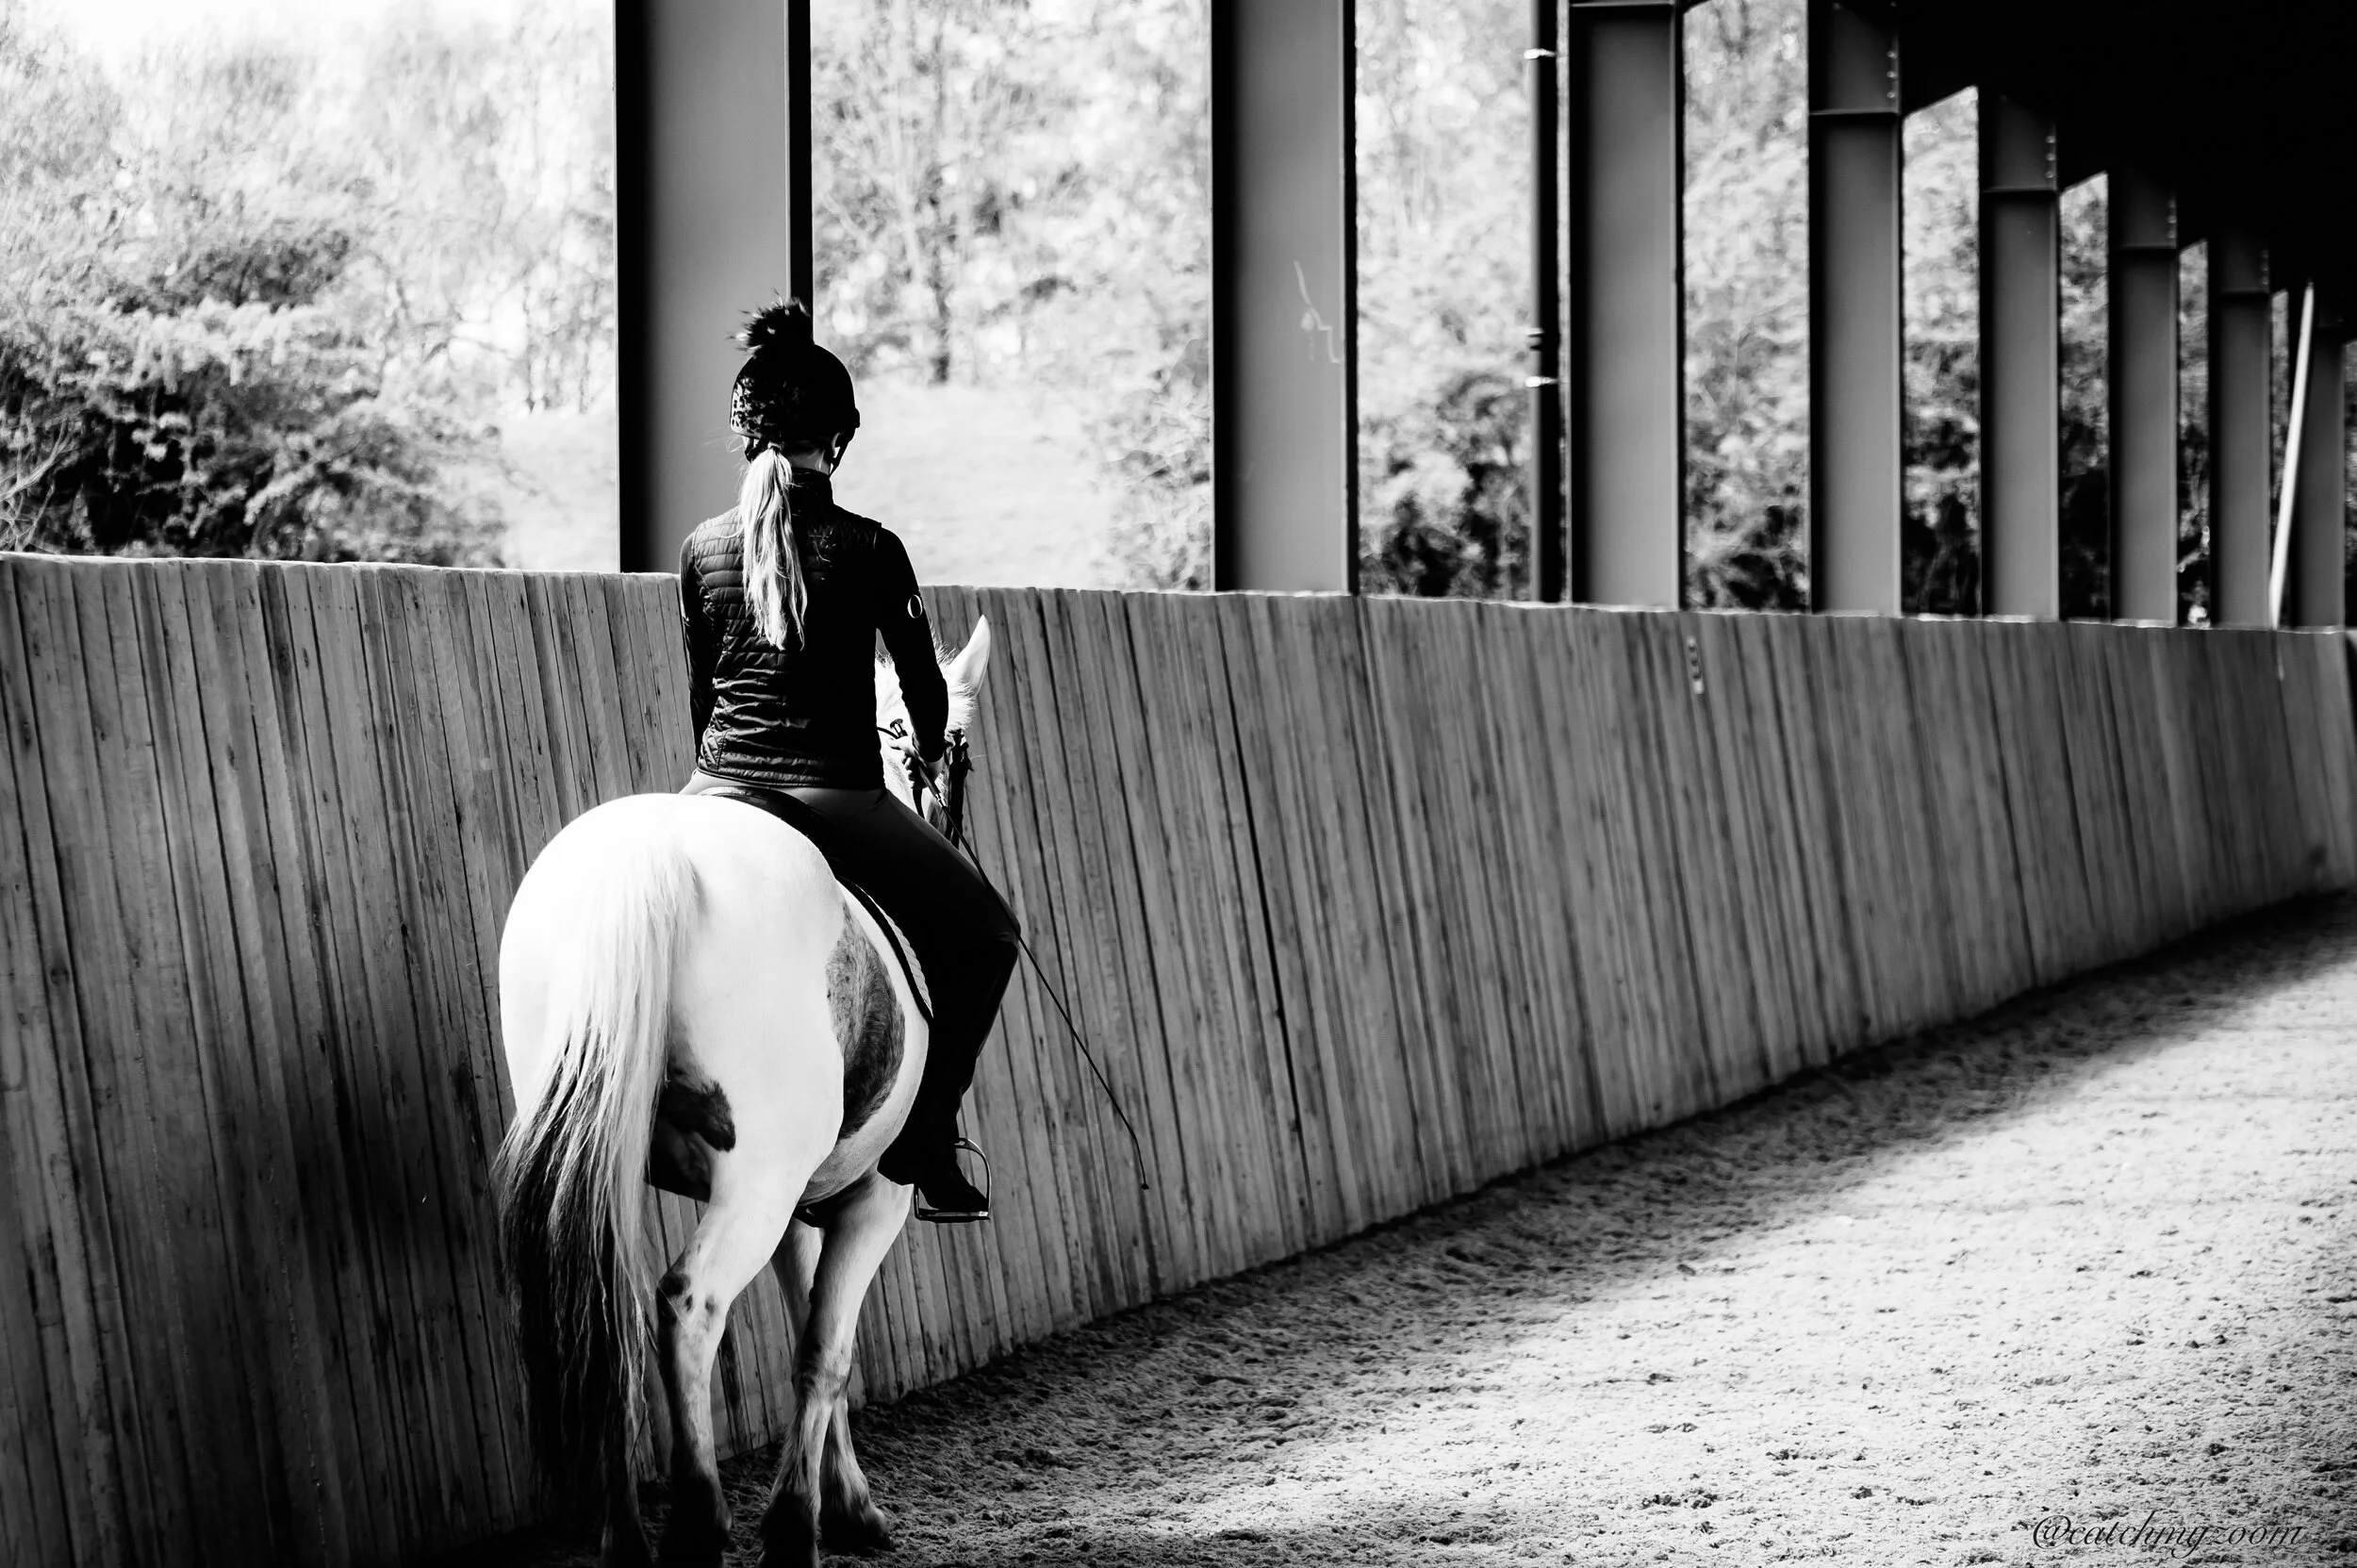
Image 4

1/640s, f/5.6, ISO 400, zoom lens 70-300mm, f/4.5-5.6
I took this image at Kingston riding centre in the afternoon. It was overcast. I converted this image into black and white photo to show the contrast of dark shadows and highlights. It would fall into Chiaroscuro shadow category according to Michael Freeman as mentioned in my previous blog Shadowland. The contrast is strong and well defined. I used a mid aperture f/5.6 to capture the subject and its immediate surroundings in focus and left the background slightly blurred. The subject casts shadows as well. The dark shadows, mid tones and highlights are well defined here.
Image 5

1/250s, f/4, ISO 450, wide angle lens 14-30mm, f/4S
I took this image in a Surrey village before sunset during the golden hour. The source of light is behind the subject/bush and the silhouettes of trees and bushes are clearly defined. I used a wide angle lens as I wanted to capture as much as possible of the landscape, especially sky with clouds. It gives the impression that clouds are pointing towards the centre of the image, towards the light source. The aperture is quite open (f/4). In this black and white picture there are well defined dark shadows (silhouettes), mid tones (grass and some parts of clouds and sky) and highlights (white clouds).
In “silhouettes shadow type”, the key is to exposed for the light background and keep the subject dark, even black, according to Michael Freeman, as described in my previous blog Shadowland.
Other images I took for this project (click the image to enlarge it) and in my previous blog Shadowland :


AC 3.2: Assess photographic activity
During this assignment and in the past couple of weeks I spent learning about shadows. Thanks to this course and a very inspirational photographer Michael Freeman I discovered different types of shadows and learnt to identify them and play with them. I learnt to look for shadows, use them creatively and compose them into an image to create an attention to a certain part of the picture and/or to convey a message.
I am inspired by nature and landscape which is visible in my pictures. However I would like to spend more time discovering and practising shadows in street and urban photography.
Before taking any photograph I had to make sure that I set up my camera in a specific mode to capture the final image in the way I intended to. Different set up is preferred for capturing movement and different one is needed for capturing a still photos.
The exposure is playing a big part on making decision on a final image. It depends if I want to open shadows or if my aim is to capture a mystery on the picture. When editing the final image I can play with contrast and enhance it (according to Michael Freeman in his video Shadowland).
My aim was to capture light trails as part of this assignment and I am pleased with the result. I just wish to go to London and practise this type of photography there with many lights and interesting buildings, that’s on my list as part of this practise.
I took many different images and it was not easy to pick only some of them.
I used my digital camera Nikon Z6, a tripod, a zoom lens 24-70mm, f/2.8S, a prime lens 85mm, f/1.8S, a telephoto lens 70-300mm, f/4.5-5.6 and a wide angle lens 14-30mm, f/4S. For final editing my images I used Lightroom.
Learning Outcome 4 (LO4)
Safe Working Practices (AC 4.1)
During this photography assignment I ensured I followed the safety checks:
Made sure of my immediate surroundings to avoid tripping over objects, cables, stones etc.
Stayed safe in the evening when taking images with light trail; at the train station and around the village
Made sure I was aware of cars, buses and people passing by when taking pictures
Stayed at a safe distance from animals, vehicles, busy roads etc.
Made sure I wasn’t trespassing on private lands
Took pictures of people only with their permission
I asked for a permission to take photographs at the Kingston riding centre
Made sure my tripod was safely positioned
Declaration :
‘I confirm that the attached portfolio is all my own work and does not include any work completed by anyone other than myself.'
Jitka Zrust
Sources: A.Adams, The Negative; M.Freeman, Light & How to photograph it; M.Freeman, The Photographer’s eye: a graphic guide; internet; course material, www.lensculture.com